In the previous article, we learned how to install debian from ISO. After install there are a few things we need to configure to make sure that everything is setup as per our requirements. In this article, we are going to configure network settings.
By default, the Debian system is conigured to used dhcp settings, i.e. it will take any ip address provided by the router. This is the not the best setting if you plan to use the system as headless server as you will always have a different ip address and can’t SSH in. So to get a static ip address from our router we need to make a few changes to the network settings. Let’s figure out how.
Configuration
First we need to find out which interface is being used currently. Your system might have multiple interfaces installed, so we need to figure out which one to configure. You can list out the interfaces configured by using the following command.
ip aIt will show an output like below.
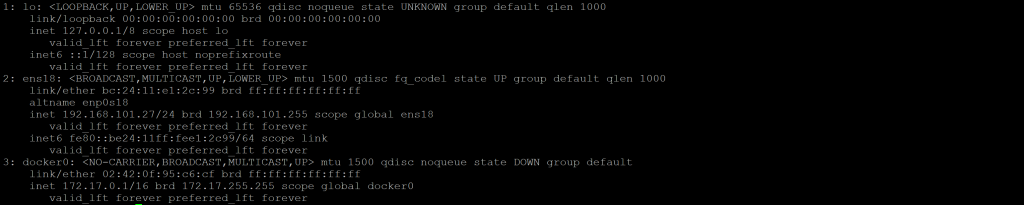
In the image you can see that there are 3 interfaces configured,
- lo
- ens18
- docker0
The first one “lo” is a standard interface which loops back to the system itself. It allows the term localhost to point to self. It usually has an ip of 127.0.0.1 as seen in the screenshot.
The second one “ens18” is the Ethernet port for the system. It might be named different for your system (Linux has been known to use different naming system on different versions). Here it has a address of 192.168.101.27 . This is the interface you want to configure as it’s connected to the local router. We will be configuring this one. you can note down the name if required.
Third device is “docker0” which is the networking interface installed by docker, we will go thought docker setup in different article.
In the next step we find the interface. Linux uses a file interfaces which we need to modify. Let’s open and modify the file by using the following command.
nano /etc/network/interfacesIt should open up a file like below.

In the above file we need to modify the “ens18” from dhcp to static by replacing the block with the following information.
auto ens18
iface ens18 inet static
            address 192.168.101.27/24
            netmask 255.255.255.0
            gateway 192.168.101.1
Here we have replaced the word dhcp with static and provided the address to receive from the router (Make sure there are no ip conflicts while entering the ip address here). The other important information we need to stae here is the gateway for the network. This isually the ip address of the router where your dhcp server is running. Optionally, you can also state a subnet here using the keywork subnet as “subnet 255.255.255.0“.
Just reboot the system and it should have the ip address stated above as the system ip. you can verify using the “ip a” command.
To revert the changes and move back to the dhcp version you can change the setting to below.
allow-hotplug ens18
iface ens18 inet dhcp
The “allow-hotplug” allows the interface to be connected ot disconnected based on the cable status. This allows the port to be plug-&-play compitable on the hardware level.
There are also some other useful commands to for managing network interface on a Linux system:
- ifup – to turn on a interface.
- ifdown – to turn down a interface.
These allow you to turn off a interface, make modifications to it and then turn it on again without restarting the complete system.